Realme X50 Pro Downgrade File (Android 12 to Android 11) will help you to roll back your device Android update to the lowermost stable version. As you already know Realme X50 Pro recently got Realme Ui 3.0 Android 12 update, and you are here means you have already updated it to the latest version, No doubt this update comes with too many new options, changes, and features, but, it also has many bugs such as faster battery drains, heats up, and slowness. So, if you want a free solution to Downgrade Realme X50 Pro Android 12 to Android 11 then this guide will help you to do it without a PC easily.
Through this guide, we will help you with a step-by-step process of how to roll back Realme X50 Pro Android 12 to Android 11 easily.
The procedure is pretty simple, all you need is to download the Downgrade file from below and then copy it to your device’s memory, you can do this via file transfer app or using a laptop. Things you need to remember before downgrading or rollbacking a device to a lower version.
- Rollbacking will erase all your personal data, don’t forget to take backup
- Your device battery charged should be more than 70%.
- Your device storage should be clear enough, otherwise, you may face updating error and an updating failure can cause a bricking device. You can check storage space through settings =>> Storage options, or via a third-party file manager.
- The Downgrading will not allow you to get the beta or early stages versions.
- Some rollbacking file comes with modified systems, that will stop you to get the latest patch updates.
- If you need some specific Realme UI 3.0 pre-install app on your RealmeUI 2.0 then you need to create a manual update file.
Download Realme X50 Pro Downgrade File (Android 12 to Android 11)
Download Realme X50 Pro Downgrade File to your computer. Please Comment me down below regarding any issues or errors with the file.
File Name: RealmeX50prodowngradefile.zip
File Size: 5.6GB
Download: Click ME
Pass: Droidsolution.com
Credit:
Telegram Support: Join Here
How to Downgrade Realme X50 Pro RealmeUI 3.0 to RealmeUI 2.0
There are three ways available to downgrade the Realme GT master phone, you can follow the file Manager installations, Recovery Mode installation or via Settings app installation, below we shared all methods, You can use that method that suits you. Before that, you need to follow some necessary steps:
- Download the Realme X50 Pro Downgrade file to your laptop on Phone
- Then transfer it to your phone storage
- Remember the location, where you store the file
- Now you can use the below process the roll back your Realme device.
Settings App Installations
- Open Settings
- Then go down below and tap on About Device
- Tap on the Realme UI 3.0 logo
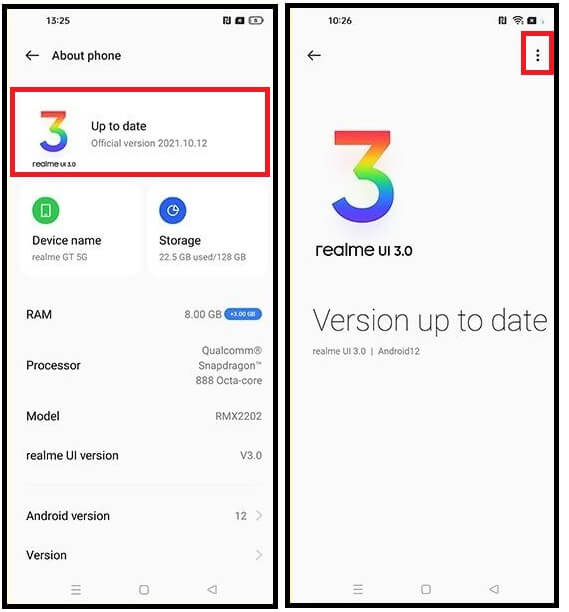
- Now Click On “3” Dots from the top-right corner
- Then Select the Local Install
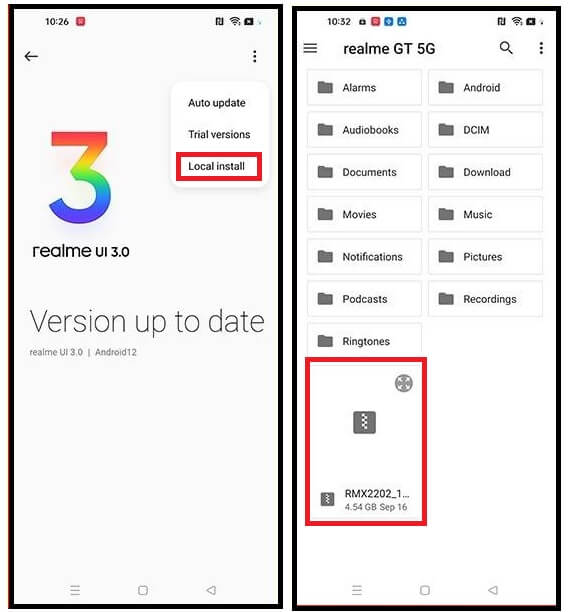
- Now select the Downgrade file
- The process of the downgrading will be started
- Wait for finish
- Once finished, the device will reboot
- Done.
Recovery Mode Installations
- Power off your phone.
- Then press & hold the volume down and power buttons at the same time until you see the Realme logo
- Select the Language
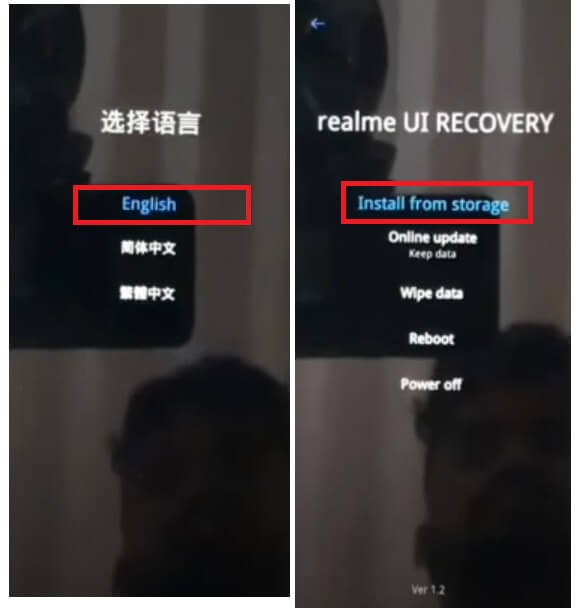
- Then select recovery mode by using the Volume key and for select use the power key
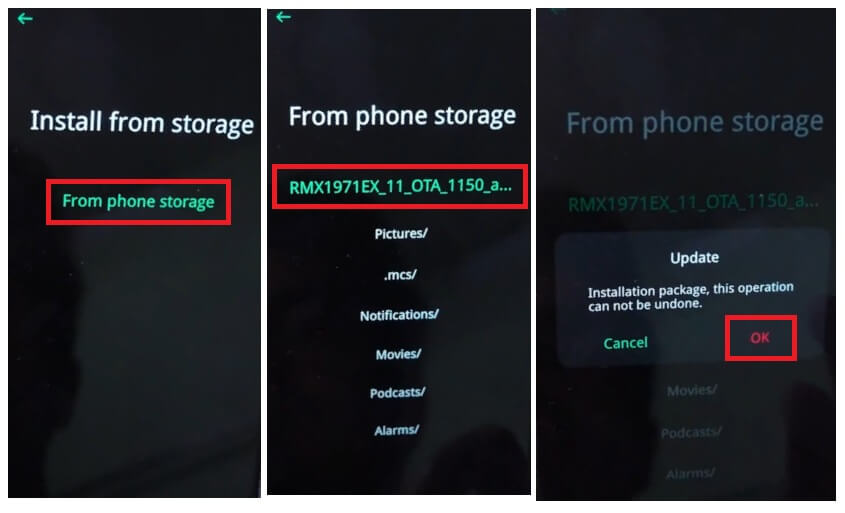
- Now navigate to the install from storage & confirm it.
- Then Find the roll-back package & select it
- The downgrading process will start
- Wait for the finish,
- Then select Reboot device to boot into Normal mode
- Done.
File Manager installations
- Open the File Manager app on your Realme X50 Pro device
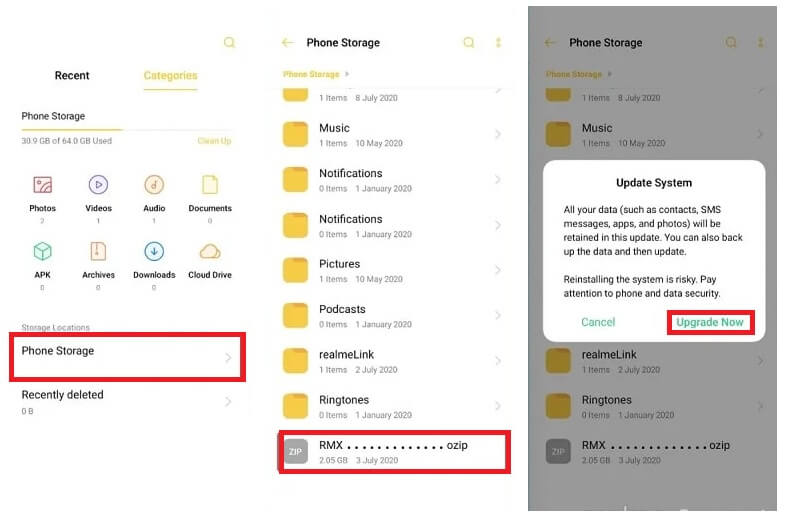
- Go to the Memory and locate the .OZIP format rollback firmware file.
- Tap on that, Now an Update System prompt will appears
- Select Upgrade
- Now the process will start
- wait for finish
- Once finished, the device will reboot
- That’s it.
Read More: Vivo Fastboot Tool V1.0 Download Free Latest Bootloader unlock, Reboot to edl
